

GET A QUOTE
How to Put a Triangular Bandage on Hand
In first aid situations, a triangular bandage is one of the most versatile tools you can have. It can be used to support injured arms, immobilize body parts, or cover wounds. If someone sustains an injury to their hand, knowing how to properly apply a triangular bandage can prevent further harm and help ease the pain. This blog will provide a detailed, easy-to-follow guide on how to put a triangular bandage on a hand, covering everything from the basics of hand injuries to step-by-step instructions for proper bandaging.
What Is a Triangular Bandage?
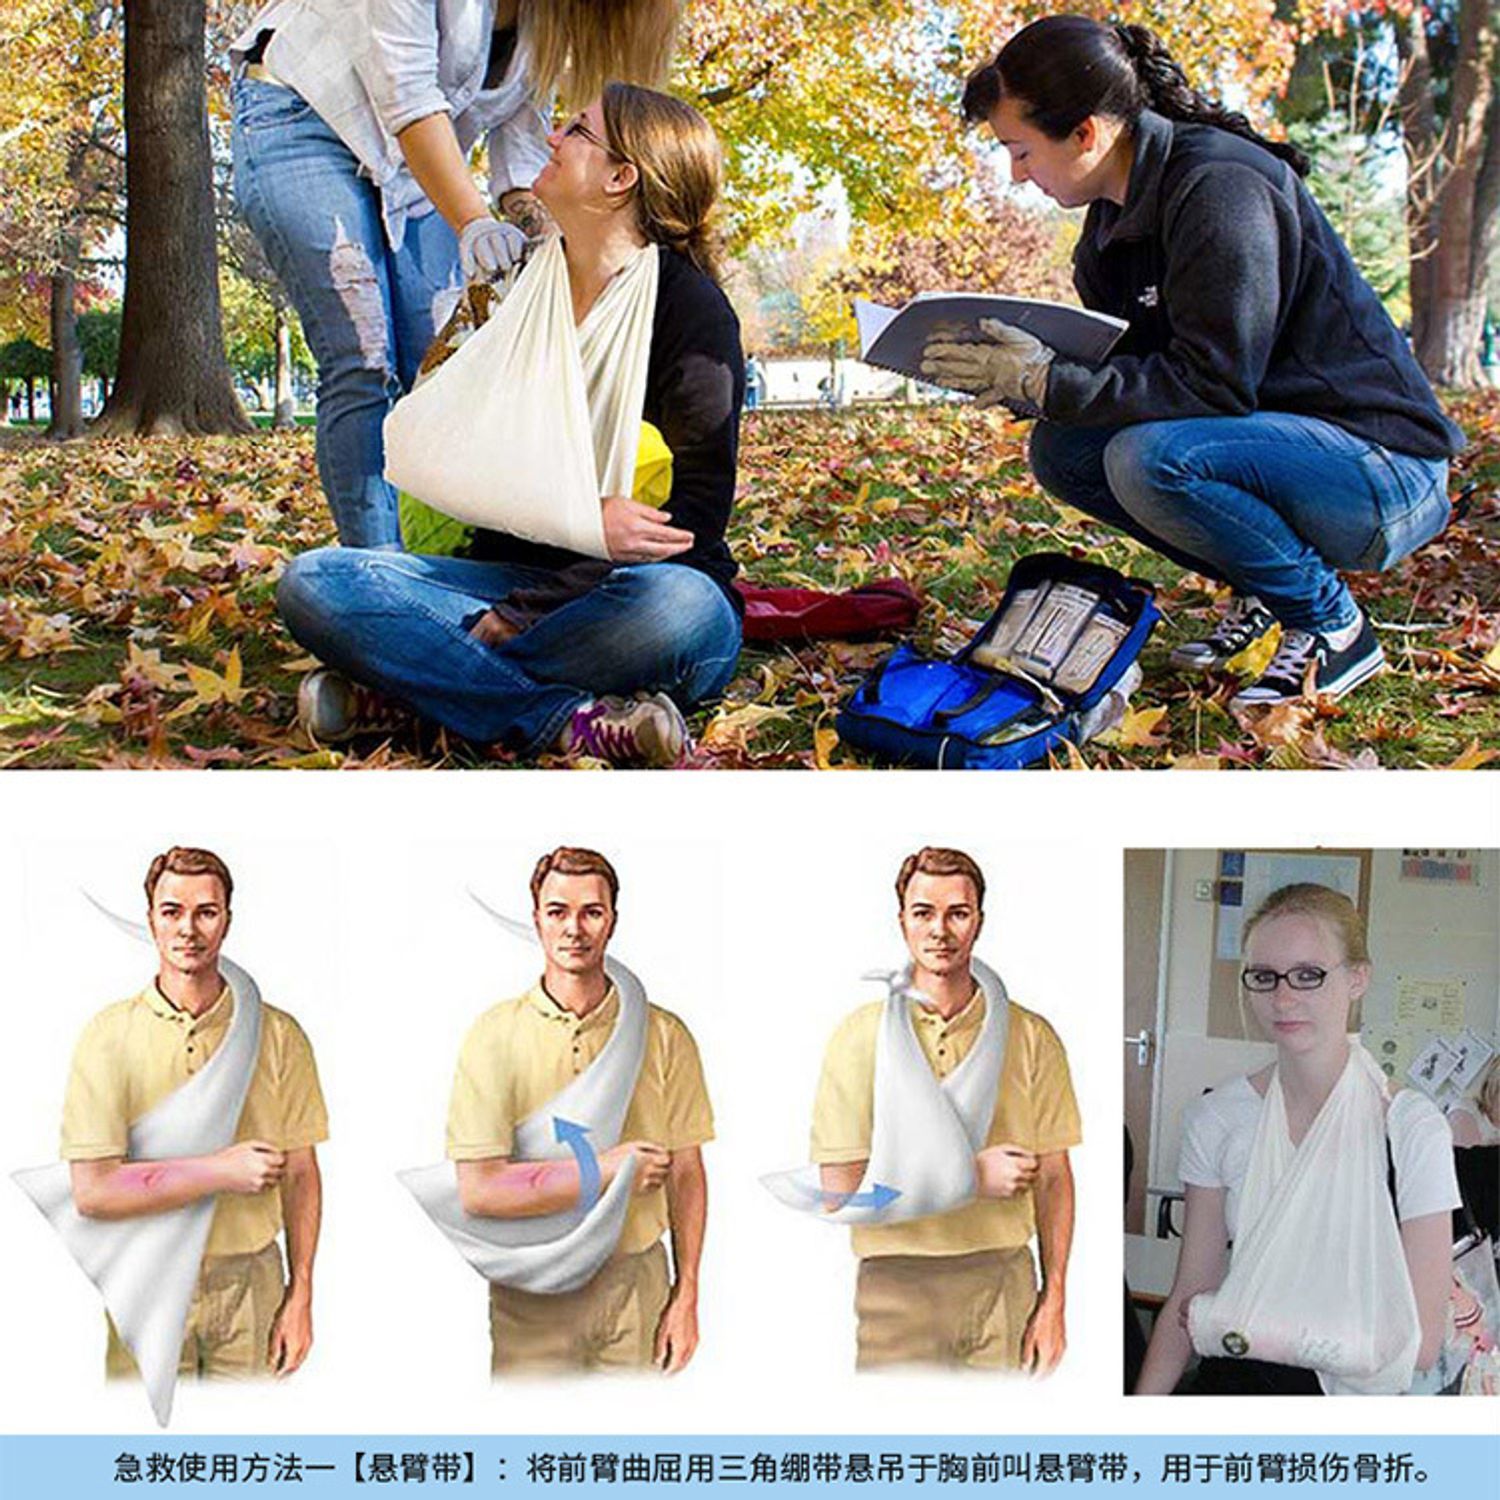
A triangular bandage is a large, triangular-shaped piece of cloth, typically made of cotton, used in first aid to immobilize or support injuries. Its size and shape make it adaptable to a wide range of uses, including as a sling for arm injuries or a bandage for wounds. It’s commonly included in most first aid kits due to its practicality and effectiveness in treating various injuries.
Why Use a Triangular Bandage for Hand Injuries?
Hand injuries are quite common, whether due to cuts, fractures, or sprains. Using a triangular bandage on the hand helps by:
- Providing immobilization for fractures or sprains.
- Protecting wounds from contamination.
- Offering support during the healing process.
Using a triangular bandage properly can help stabilize the injury and prevent further damage while you seek professional medical assistance.
Step-by-Step Guide on How to Put a Triangular Bandage on Hand
Step 1: Assess the Injury
Before applying a triangular bandage, it's crucial to assess the injury. If the hand is bleeding, you’ll want to stop the bleeding first by applying pressure with a sterile gauze pad. In cases of fractures or sprains, be gentle with the injured hand to avoid worsening the injury.
Step 2: Prepare the Triangular Bandage
To start, unfold the triangular bandage and lay it flat. It should form a large triangle. Fold the bandage into a narrow strip by bringing the pointed end to the center, and continue folding until you have a long bandage strip.
Step 3: Position the Bandage on the Hand
Place the folded triangular bandage over the injured hand. Ensure the center of the bandage covers the palm while the two ends of the bandage extend beyond the wrist. The goal is to secure the bandage tightly but not so tight that it cuts off circulation.
Step 4: Secure the Bandage
Wrap the two ends of the triangular bandage around the wrist, crossing them on the back of the hand. Then, bring the ends back to the front, securing the bandage by tying a knot just above the wrist. Be sure the knot is firm, but again, avoid cutting off circulation.
Step 5: Check Circulation
After securing the bandage, it’s important to check the patient’s circulation. Ensure that the bandage is snug but not too tight. You can do this by checking the color and warmth of the fingers. If the fingers appear pale or cold, loosen the triangular bandage slightly.
Step 6: Immobilize and Elevate the Hand (if needed)
If the injury involves a fracture or severe sprain, it may be necessary to further immobilize the hand. You can use a second triangular bandage to create a sling, supporting the arm and keeping the hand elevated. Elevating the injured hand reduces swelling and promotes blood circulation, which helps with the healing process.
When to Use a Triangular Bandage on Hand Injuries
For Sprains and Strains
Sprains and strains are common hand injuries, often caused by overuse or sudden trauma. A triangular bandage is ideal for these injuries as it provides the necessary support and immobilization, reducing pain and swelling. After applying the triangular bandage, it’s advisable to keep the hand elevated to further minimize swelling.
For Fractures
A triangular bandage is commonly used to immobilize fractures. If you suspect a hand fracture, using a triangular bandage can help stabilize the area until medical help is available. Remember to be gentle during the application process to avoid causing additional harm.
For Cuts and Wounds
Cuts and open wounds on the hand can be treated with a triangular bandage. After cleaning the wound and applying antiseptic, use the triangular bandage to cover and protect the injury. In this case, the triangular bandage acts as a protective layer, preventing
dirt and bacteria from entering the wound.
Common Mistakes to Avoid When Using a Triangular Bandage
Using a triangular bandage correctly is essential to avoid further injury. Here are some common mistakes to avoid:
1. Wrapping Too Tightly
While it’s important to secure the triangular bandage, wrapping it too tightly can cut off circulation. Always check the color and warmth of the injured person’s fingers to ensure proper blood flow.
2. Not Cleaning the Wound First
Before applying a triangular bandage to a wound, make sure to clean the injured area with antiseptic. This helps prevent infection and promotes faster healing.
3. Ignoring the Injury
If you’re unsure about the severity of the hand injury, always seek professional medical advice. A triangular bandage can only provide temporary support, and serious injuries may require further medical treatment.
Benefits of Using a Triangular Bandage on Hand Injuries
Versatility
The triangular bandage is highly versatile. It can be used not only for hand injuries but also for injuries to the arm, head, or chest. Having a triangular bandage in your first aid kit ensures you’re prepared for a wide range of situations.
Easy to Use
Unlike some other medical tools, a triangular bandage is easy to apply, even with minimal first aid training. It’s a simple yet effective way to immobilize or protect injured hands.
Portable and Lightweight
A triangular bandage is lightweight and portable, making it an ideal addition to any first aid kit. Whether at home, work, or on the go, having a triangular bandage can make a big difference in an emergency.
FAQs About Triangular Bandages
How do you secure a triangular bandage?
To secure a triangular bandage, tie the ends together in a firm but gentle knot after wrapping it around the injured area. Always check for circulation afterward.
Can a triangular bandage be reused?
Yes, a triangular bandage can be reused, but it should be properly cleaned and sterilized before using it again, especially if it has been used to cover an open wound.
How tight should a triangular bandage be?
A triangular bandage should be tight enough to hold the injury in place but not so tight that it restricts blood flow. Always check for signs of reduced circulation, such as pale or cold fingers.
Conclusion
Knowing how to properly apply a triangular bandage on the hand is an essential first aid skill that can help prevent further injury and promote healing. Whether you're dealing with a sprain, fracture, or wound, a triangular bandage provides reliable support and protection. At RISEN Medical, we are committed to offering top-quality triangular bandages and other essential first aid supplies to ensure you're always prepared for any emergency. Visit our website today to explore our wide range of medical products and ensure you have the right tools in your first aid kit.